Use the clipless wand only on the starting state its maker permits, keep your guiding hand outside the heated zone, and control the free end without forcing short pieces close to the barrel.
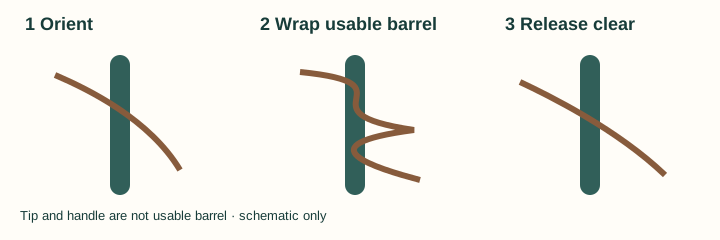
Set up a controllable section
- Read the exact manual for dry or other permitted use, glove directions and resting surface.
- Detangle and clip unused hair clear of the barrel.
- Choose a section whose free end you can see and control. If a short piece cannot be held without approaching the hot zone, use another permitted method.
- Practise the orientation with the unplugged, cold tool before heating it.
Wrap the working barrel, not the tip
Hold the handle and place the usable barrel as the model tutorial directs. Guide the section around the barrel in an orderly path without stacking several layers in one spot. On a cylinder, placement uses one stated diameter. On a taper, moving toward the wider or narrower end changes contact geometry; keep placement consistent when you want a repeatable comparison.
The current ghd Thin Wand tutorial is a specific example: it places that wand diagonally, tip down, and wraps by hand. Its section choice and timing belong to that model and technique. A supplied glove is protection for the supported hand position, not permission to grasp a barrel.
Release without escalating heat
| Observation | Likely handling check | Change |
|---|---|---|
| End keeps escaping | Section is too short or hand position is unclear | Choose a different permitted method rather than moving fingers closer. |
| Wrap overlaps | Section is crowded on usable length | Use a narrower section and lay each turn visibly. |
| Shape varies along a taper | Placement moves between wide and narrow zones | Mark a consistent visual zone; do not call one shorthand the full profile. |
| Release catches | Section crosses itself | Stop, let the tool cool if necessary and unwind without pulling. |
Move the tool away or unwind as its instructions show, then let the formed section cool before separating it. Formation and retention are different questions; do not compensate for a handling problem with more heat. Compare tapered and cylindrical placement, check barrel geometry, or troubleshoot a curl that opens later.
Evidence: the US ghd Thin Wand listing identifies a 0.5-inch cylindrical barrel and included glove; the maker's Thin Wand tutorial supports the attributed orientation and wrap example.
Repeat placement without turning it into a rule
Choose one visible starting point on the usable barrel and one section from each side. Keep section breadth, barrel zone and release order consistent, then compare only the path you can observe. On a taper, a wrap that drifts toward the narrow end is not equivalent to one held on the wider zone. That explains geometry without predicting hold or a particular finished look.
Park the wand on its documented stand or heat-resistant surface between sections. Do not lay it across clips, fabric or loose hair, and do not use the cool tip as a substitute for the supported grip. If the supplied glove is damaged or missing, check the official replacement and instructions instead of improvising protection. When a wrap cannot release cleanly, stop, switch off and allow the tool to cool before freeing the section.